Photo Organization and Back Up Plans
- On March 02, 2013
- By Jennifer Ludlum
- In Photography Tips
 0
0
Photos are a very meaningful way to preserve special memories of your life. How many people do you know that say one of the first things they would grab if the house was on fire are their photo albums? My Mom is a perfect example of this scenario and I love her for it (I believe our family albums are now in a large fire-proof safe after a scary scenario with the furnace one night – everything ended up being ok).
With this story in mind, I created a service called Making Memories Last where I offer to help organize and preserve your photos and life-long memories. Who doesn’t have stacks of printed photos tucked away in a shoebox or other “temporary” storage space just waiting to be organized chronologically and creatively into a scrap book or album? And while most of us have visions of what we’re going to do with these photos “some day,” most people just don’t have the uninterrupted extra time in their life to actually get it done. That’s why I’m here! To see how I can help you visit http://www.jenniferludlumphotography.com/making-memories-last/
In the meantime, here are some basic tips to help you get started on your own. We all know how easy it is to snap a gazillion (yes, that is a made up word, but you get the point) pictures on a digital camera and then share them with the world. But how well do you keep them organized on your computer? Are they backed up in case your computer crashes? Digital organization and back-up copies are a must!
How to Better Organize Photos on your Computer
#1 Choose a photo organization system that will best fit your needs and equipment. A few options I am familiar with and would recommend include:
- iPhoto on Mac computers – it’s user friendly, fairly intuitive, and if you get stuck there are plenty of video tutorials to help you along (Just Google iPhoto help).
- Folders (My Pictures) – This is the standard filing system on a Windows based computer.
- Lightroom 4 – This is separate software you can purchase to help you organize, rate, edit, and print photos. This software is my favorite by far and offers you a great amount of versatility. There is a bit of a learning curve and you’ll get out of it what you put into it.
#2 Have all your photos (everything you’ve taken on your phone, iPad, camera, sd cards, etc) consolidated into one main place/system on your computer. This process will vary depending on the option you choose above.
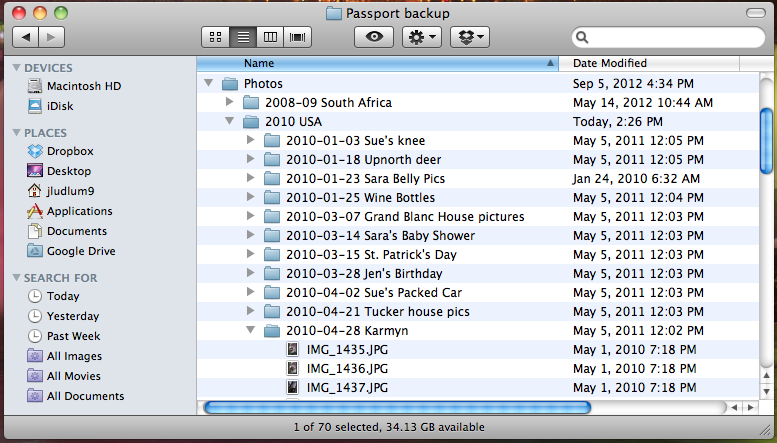
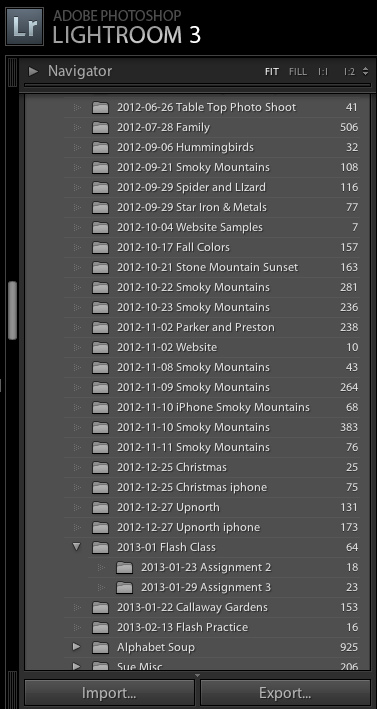
#3 With each of the systems above, the basic organization is with file folders. I suggest organizing your file folders as follows. The images below show an example of each set-up: iPhoto, Folders, and Lightroom 3/4.
- Create and organize folders by date in this format: year_month event description (example: 2013_01 New Year’s Party). You’ll notice in my organization I also add the exact date of the event. That is because I take so many photos and it is easier for me to keep track of. You can also create a folder for each year (example: 2010, 2011, 2012) as my example shows in the second image.

#4 Delete any photos you feel are duplicates or unprintable. This is very important to do every time you add more photos. We all know how easy it is to take a dozen shots of exactly the same thing. Pick out your favorite and delete the rest. Every photo takes up memory on your computer’s hard drive and you may not realize how quickly this adds up until your space is all used up.
Back up, Back up, Back up!
I cannot stress enough how important it is to make sure you have at least one option of backing up your photos. I know someone whose hard drive crashed and they lost all their digital pictures from the past 10 years. Please don’t let this be you!
The key here is to have at least two places where your photos are stored. One option is to store your working collection of pictures on your computer hard drive and select one of the following to use as a back up copy.
- Purchase an external hard drive. I would suggest 500gb or larger. The price has come down dramatically on these products so you should be able to get one for around $50. I use both Seagate and Western Digital and have been happy with both.
- Purchase a package of high capacity cds and burn a copy of all your photos onto multiple cds. One way to do this is to burn each year onto a different cd (this option may or may not work for you depending on how many photos you take and the megapixel size of your camera/photos). An easy way to keep these organized it to print a listing of the file catalog from the computer showing exactly what is burned onto each cd. Then store them in one place such as a plastic bin or cd storage container.
I take one more step in my back-up process. Some may find this a little excessive, but my photos and memories are very important to me. I store an additional copy in a fire-proof safe or another option would be to leave a copy in another location (parent/sibling/friend’s house). This way you will always preserve those memories in a separate location just in case.
Now, I do realize that this stuff takes A LOT OF TIME! And I realize that most people don’t have this extra time because they are doing what is important – they are out there making memories with their families and friends and taking photos of all their experiences. So let me help you make those memories last! Contact me with any questions or for more information on how I can help you with Making Your Memories Last.
Next time, I’ll continue this conversation and write about how to better organize your negatives and prints, scanning, as well as ideas of what to do with your digital photos (photo books, printing, collages, etc). I’d also like to hear from you – please feel free to leave a comment with your favorite tips and tactics for organizing your photos.
If you enjoyed this post, please subscribe to the Jennifer Ludlum Photography email list. You will receive an email when a new blog article is posted. Click this link to subscribe http://www.eepurl.com/t4Aen


Follow Me!